Healthy Travel Recipes & Tips
We recently flew to San Francisco. With a layover, the door-to-door trip from Madrid clocked 19 hours. We've had similarly long (and longer) trips over the years, and the stress of air travel is real. The dry recycled air, sitting for long periods of time in a confined space, poor quality food, and crossing time zones all challenge our digestion, circulation, hydration, and circadian rhythm. In addition to the physical stress, the pre-trip preparations along with the hustle and bustle of airport security, crowds, and long lines deplete emotional energy as well.
While I'll never get used to the grind of air travel (does anyone?!), I've learned what foods to pack in my bag and how to adjust my mindset to ensure I feel the best I can while in transit and after I land.
Mindset Tip #1: Make the Best Choice Available in the Moment
When it comes to our health, we often get stuck in the all-or nothing mentality. We expect to always make the "right" choice. When we don't, we instantly feel guilty and dismiss the possibility that the right choice might not have been possible, or even desired, given the context.
When we hold ourselves to an ideal standard, it's difficult to embrace reality. This can be especially problematic when traveling. Life is a balance of ideal and less-than-ideal choices. But traveling throws off that balance because those ideal options are often even further out of reach. Which is okay if we remember the following formula:
You + Your circumstance = The Right Choice
We’re not programmed robots. To be truly healthy and sane, focus on making the best choice available in the moment, rather than fixating on that ideal standard that’s not always realistic.
Keep in mind, too, that the best choice available is often one we have more control over than we think. Read more in tip #2.
Mindset Tip #2: Plan Ahead to Supplement
I've said it before: research shows we make better choices for our future self than our current self. In other words, plan ahead! We're more likely to choose foods that are nourishing and satisfying when they're just as convenient as anything else.
When we take time to imagine how the travel day will unfold and anticipate our food needs, we can avoid many common pitfalls. Is there really any reason not to have some trail mix or a hearty grain veggie salad stashed in our bag?
An added benefit? By planning ahead, we're signaling to ourselves we're worth it, which boosts confidence in our capacity to act on behalf of our own wellbeing.
If you're short on time or new to planning food for trips, start small. Don't overwhelm yourself by trying to bring all the food you'll need for the day. Remember, whatever you bring from home is a positive supplement to plane and airport food. The lineup below gives several good options.
Tips for Preparing to Fly
When choosing foods to travel with, prioritize quality protein and fats and stick to familiar foods that you know are easy to digest. This is not the time to try something new!
Make sure to have well-balanced, substantial meals the day before and the day of traveling. There's nothing worse than fighting nausea due to riding in the backseat of a weaving cab or on a turbulent plane on an empty stomach! (You + your circumstance --- case in point.)
Most important of all, hydrate in advance to avoid jet lag. We know to drink lots of water on the plane. But I'm talking about hydrating like a crazy person the day before you travel. I drink 4 liters of water the day before and 2 liters before getting on the plane the day of, depending on time of day I'm flying. Then I'll drink 3-4 more liters while flying, depending on flight duration. By doing this, I rarely notice jet lag, especially traveling west. Try it out and see for yourself! :-)
“Life is a balance of ideal and less-than-ideal choices. Focus on making the best choice available in the moment.”
Travel Recipes
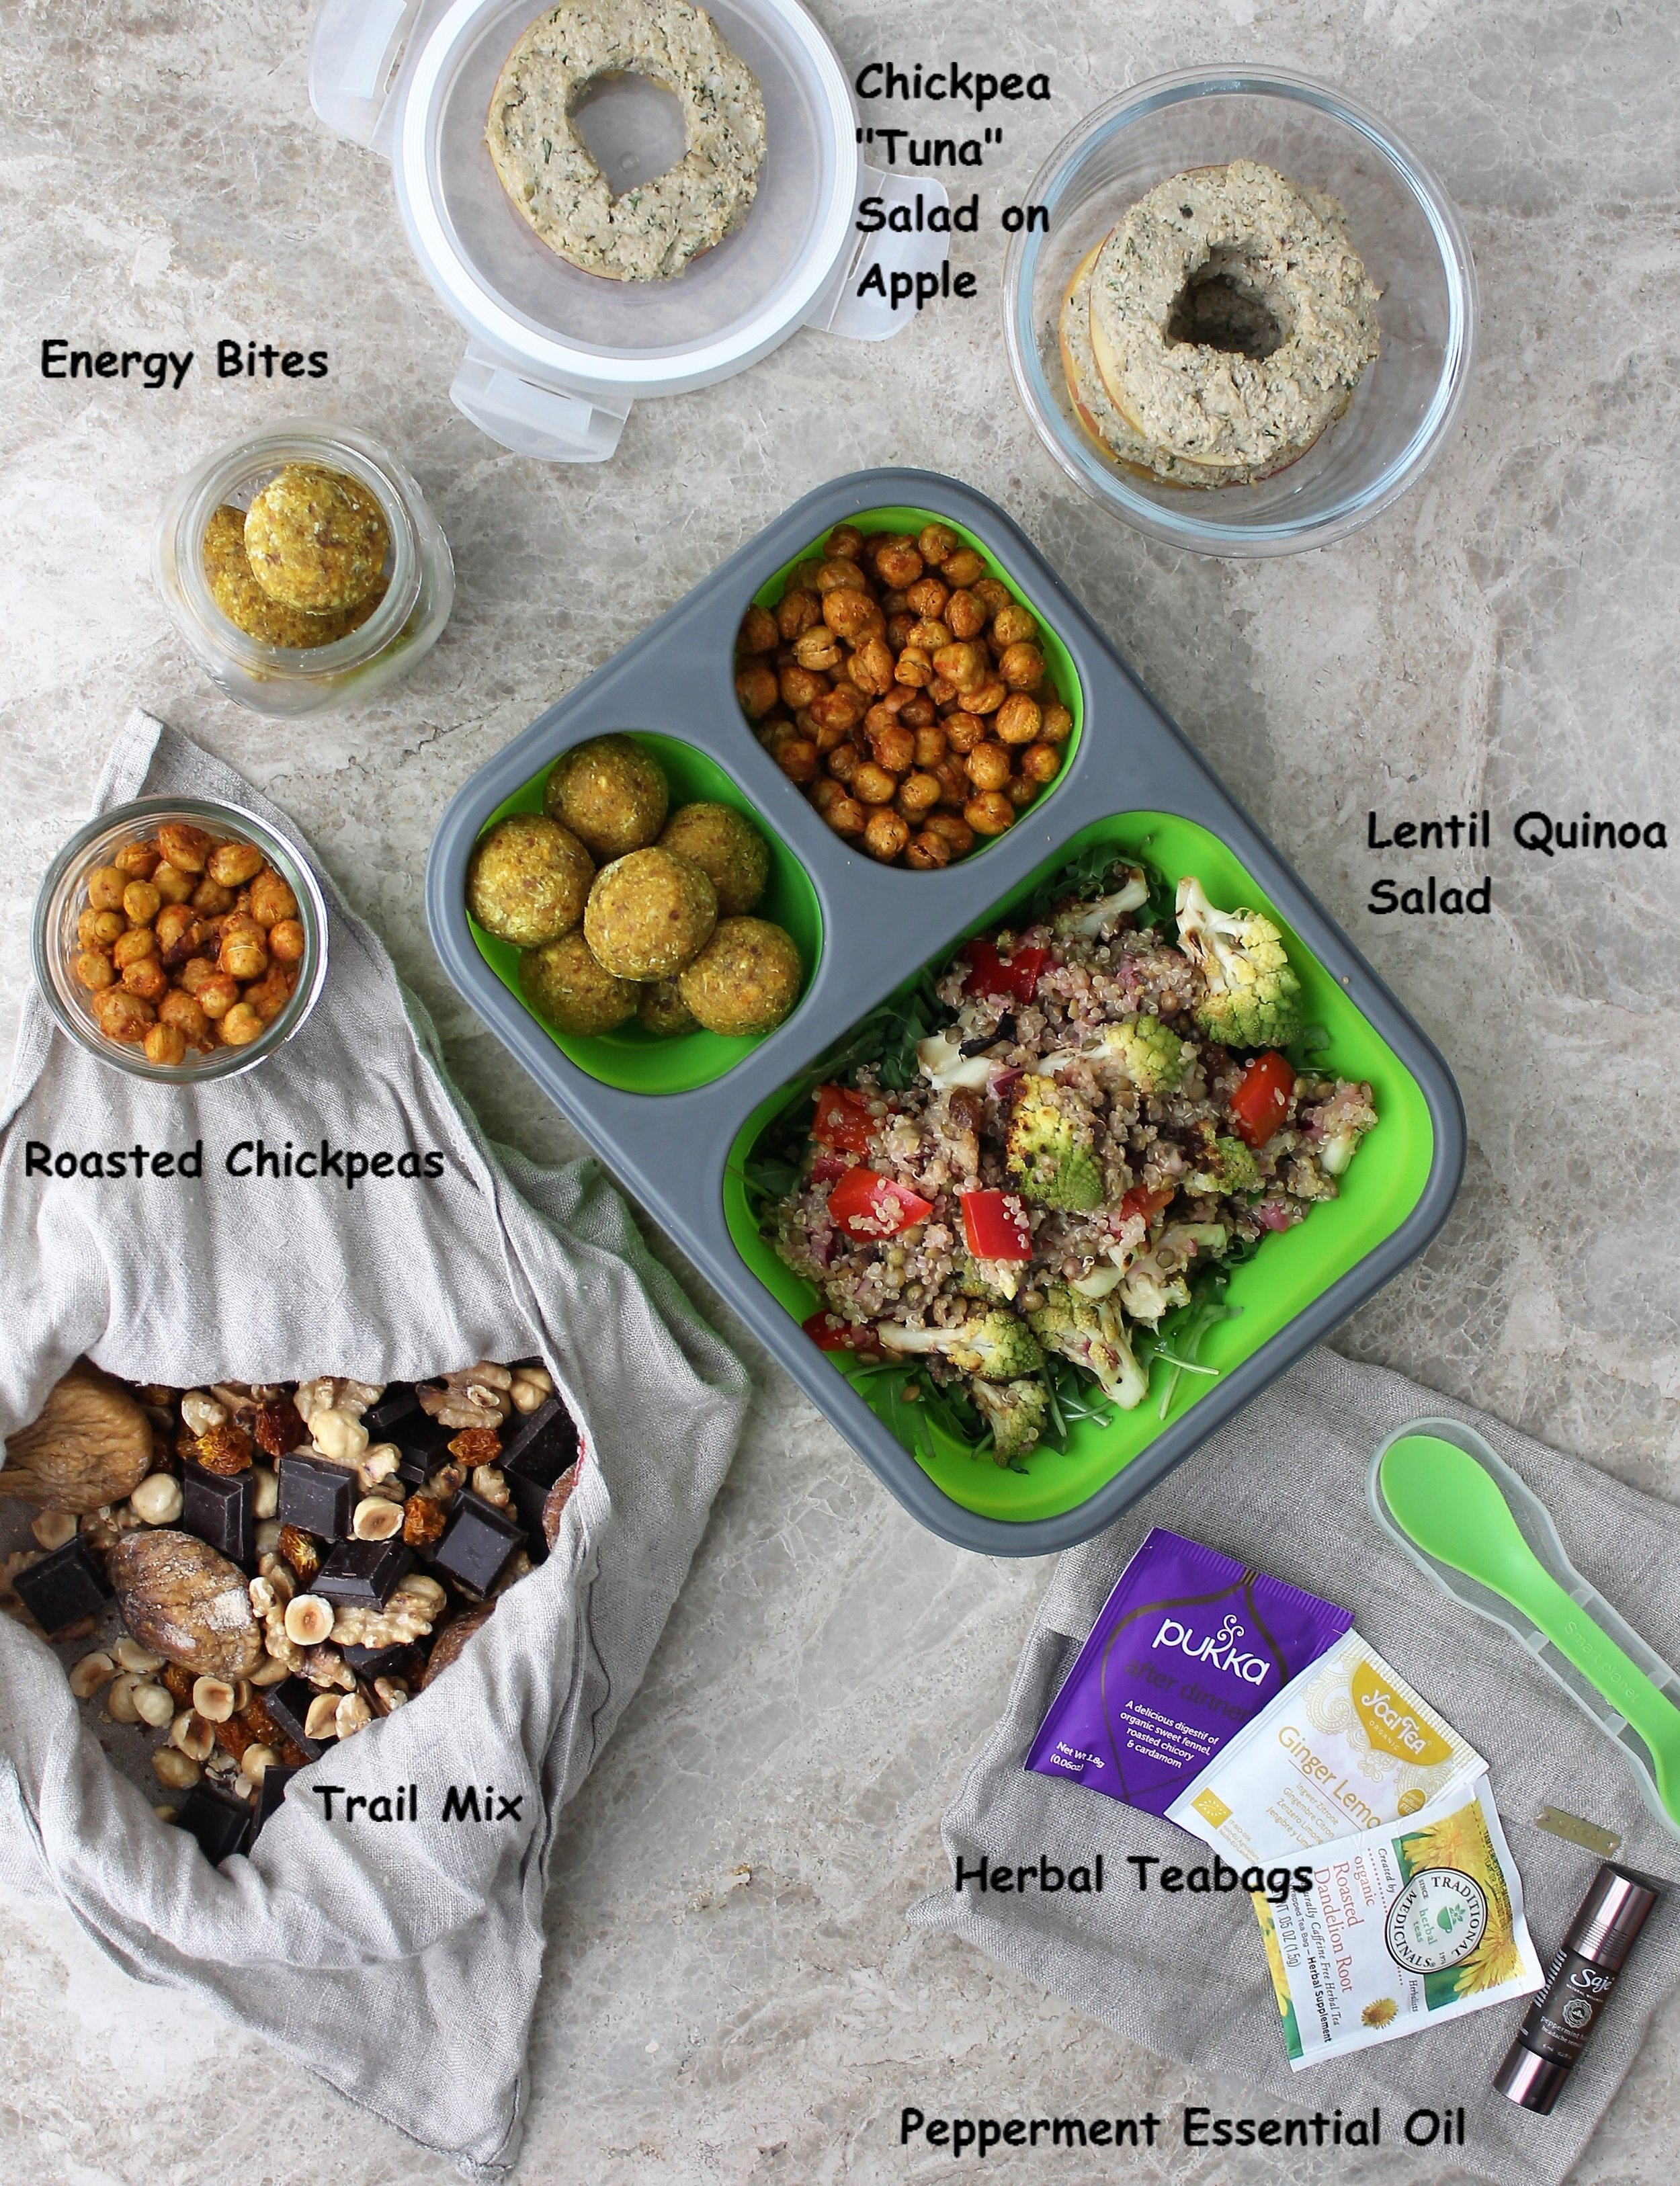
Lentil Quinoa Salad with Roasted Vegetables (recipe below)
Chickpea "Tuna" Salad on apple slices (recipe below)
Lemon Turmeric Cashew Energy Bites (recipe below)
Other food and items pictured:
Trail mix: a simple mix of toasted nuts (pictured: walnuts and hazelnuts), dried fruit (pictured: figs and golden berries), dark chocolate chunks. Sometimes I'll add toasted coconut flakes as well.
Smoky roasted chickpeas: used as a snack or to top the quinoa salad (roasted 400 F/200 C for 20 minutes with avocado oil, smoked paprika and salt)
Herbal tea bags: something for all ailments -- relax, calm the stomach/nausea, or headaches.
Peppermint essential oil: great for headaches that occur on flights due to change in cabin pressure or the strongly scented hand lotions people use.
Lentil Quinoa Salad with Roasted Vegetables
Serves 4
3/4 cup (140 gr) quinoa
1/2 cup (95 gr.) green lentils
1 head romanesco (or broccoli, cauliflower), head and tender stem cut into florets
2 Tbsp. avocado oil (or ghee, coconut oil)
Juice of 1 lemon
2 Tbsp. sherry vinegar
3 Tbsp. extra-virgin olive oil
1/2 tsp. salt and pepper to taste
1/2 small red onion, minced
3 Tbsp. raisins or currants
1 red or yellow bell pepper, diced
Soak lentils and quinoa together overnight or for 8 hours. Rinse and drain, then add to a medium pot with 2 cups (480 ml) water and a generous pinch of salt. Cover, bring to a boil, reduce heat to simmer, and cook covered for 15 minutes, or just until water is absorbed but grains are not sticking to the bottom. Remove from heat and keep covered to steam for five minutes. Fluff with a fork.
In the meantime cook vegetables and make dressing: Preheat oven to 400 F / 200 C. Add chopped romanesco to a baking tray, drizzle with oil and several pinches of salt and pepper. Roast 15-20 minutes, until browned and crisp-tender.
In the bottom of a large mixing bowl, whisk together lemon, vinegar, olive oil, salt and pepper to taste. Add red onion and raisins to marinate in dressing while other ingredients are cooking. Toss in cooked quinoa and lentils, roasted romanesco, diced bell pepper, and raisins. Stir well from the bottom up to evenly distribute the dressing. Eat as is or serve over a bed of arugula as pictured above.
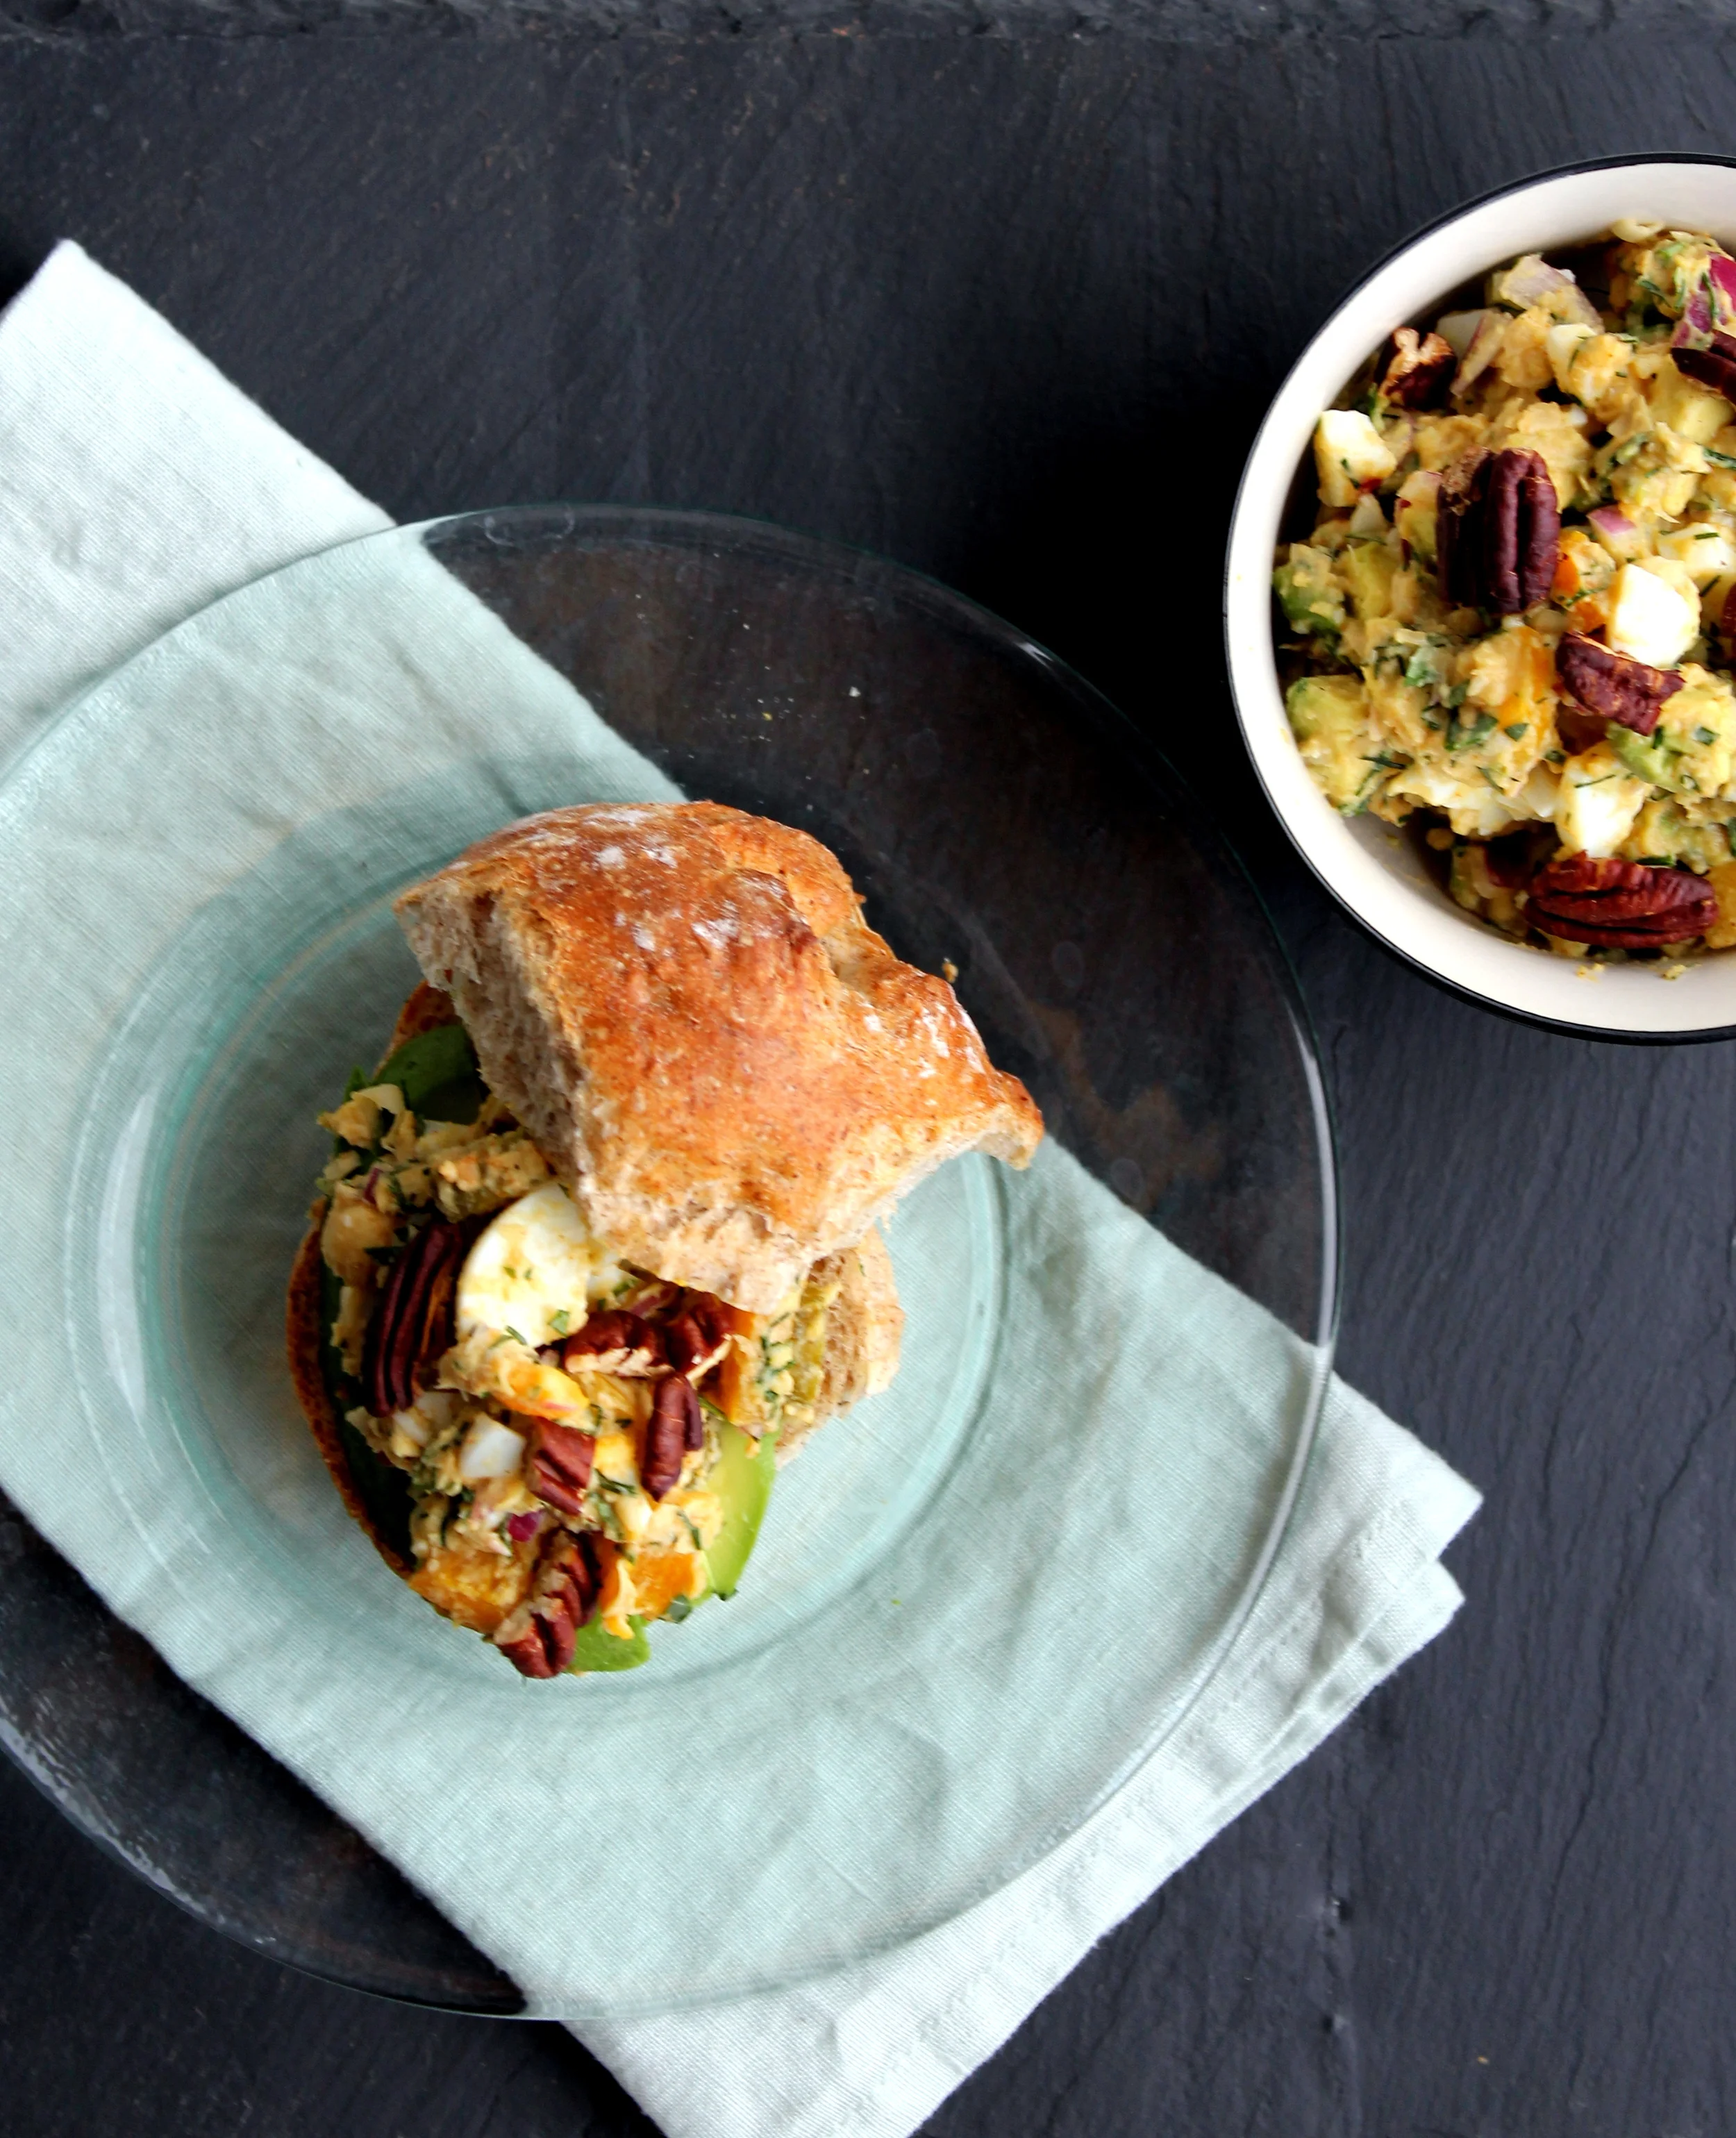
Chickpea "Tuna" Salad
Notes: Recipe calls for soaking sunflower seeds. This is an important step to achieve the right "tuna-like" texture. If you forget to soak, soak for 10 minutes in recently boiled water.
1/2 cup sunflower seeds, soaked 2-6 hours
1/2 small red onion, roughly chopped
1-15 oz. can chickpeas, drained & rinsed (or 1 1/2 cups, cooked)
6 cornishons, roughly chopped
2 Tbsp. Tahini
1 Tbsp. white wine vinegar
2 tsp. sherry vinegar
2 Tbsp. chopped dill
Scant 3/4 tsp. salt
Drain and rinse soaked sunflower seeds.
Add to a large food processor along with the remaining ingredients. Pulse until everything is uniformly minced. Continue processing until you get the desired texture. You can leave it chunky or process until it's smooth and creamy, as shown above.
Serve as a spread in a wrap, on crisp apple rounds, or with crackers.
To make apple rounds, remove core with an apple corer, then slice into rounds. You should get 4 rounds (not counting the ends) from 1 medium apple. Alternatively, slice apple into rounds first, then use a paring knife or mini cookie cutter (the smallest one - ~1 in. diameter - in a set of multi-size cookie cutters) to remove the core of each slice. Apple slices prepared as shown above will soften over time. Choose very crisp apples and eat prepared apple salad within three hours. Alternatively keep the two components separate until you're ready to eat.
Lemon Turmeric Cashew Energy Bites
Makes 20-22 balls
10 Medjool dates, pitted
3/4 cup (112 gr) toasted cashews
3/4 cup (60 gr) unsweetened shredded coconut
2 Tbsp. tahini
Zest and juice of 1 large lemon
1 tsp. vanilla extract
1 1/5 tsp. ground turmeric
A few pinches of salt
Add all ingredients to a large food processor. Pulse 10-15 times to break down the dates and cashews. Then let the motor run until mixture starts to resemble course sand. Stop and scrape down sides. Process another 30-60 seconds until mixture comes together into a smooth, slightly sticky ball of dough moving around the blade.
Use a mini cookie scoop (or small spoon) to scoop small spoonfuls of dough and roll into balls. Mixture will be fairly sticky but shouldn't stick to your hands as you're rolling. If it does, dip your hands into water before rolling each ball.
Store energy bites in a single layer in an airtight container in the fridge for a week or the freezer for 2-3 months. Frozen bites travel best. Even if they're just accompanying you to work or school.
Travel Accessories
(as seen in photos)
Silicone Bento Lunch Box or a hard case such as this one (I prefer the hard case when I know I'll be packing lots in my shoulder bag and I don't want food to get smushed.)
Round glass storage container - Costco